


Nowadays, videos form an integral part of the generation of sales and new leads. If you are running a tech blog, you need to create new videos frequently to build an impact among your readers. For example, you can generate a video with a bunch of images, add titles and music to the finished media product. Moreover, you can also edit the videos captured using your smartphone or digital camera. To edit and generate videos, you require software tools such as Movavi Video Editor, which helps you to get the work done quickly.
With the help of Movavi Video Editor, you will be able to add filters, transitions, and titles to your videos. It will help you to create videos for professional use. The software also helps you to export the video to popular formats including the ability to share the videos to YouTube directly from within the video editor.
You need not require any learning experience to create videos using the editor because of the absence of any complicated settings. You just need to drag and drop controls to the editor and the video will be automatically created. It is possible to import images and videos in any format from your smartphone, computer or your digital/action camera.
With Movavi Video Editor, you will be able to remove unwanted scenes, move sections, add titles, transitions including the ability to apply 160+ filters included with the tool. You can either upload music or record your own voice using the integrated microphone on your computer. After the completion of the video editing process, you will be able to share the video using various ways. The Movavi editor helps you to upload the finished video to YouTube from within the interface.
The slideshow wizard helps you to automatically create slideshows with music and transitions easily. You can combine multiple videos on one single screen. You can record video using the web camera or record your own voice in addition to capturing sounds from musical instruments.
The video stabilization module eliminates motion distortion without sacrificing video quality. It is also possible to adjust audio frequency, normalize audio coupled with the removal of noise and special effects application. The beat detection functionality automatically detects audio rhythm to sync with the contents included with the project. The Movavi Video Editor provides support for Intel hardware acceleration, which helps you to edit and export videos quickly.
The Movavi Video Editor can be downloaded easily because the capacity of the file is only 52MB. You can test drive the functionalities for a 7-day trial period with certain limitations.
Working
To work with Movavi Video Editor, you need to double-click the desktop icon named “Movavi Video Editor 12“. If you select “Create project in full feature mode” option, you will view step-by-step instructions. You can read the detailed instructions if you select “Read Step-by-Step Guide” button.
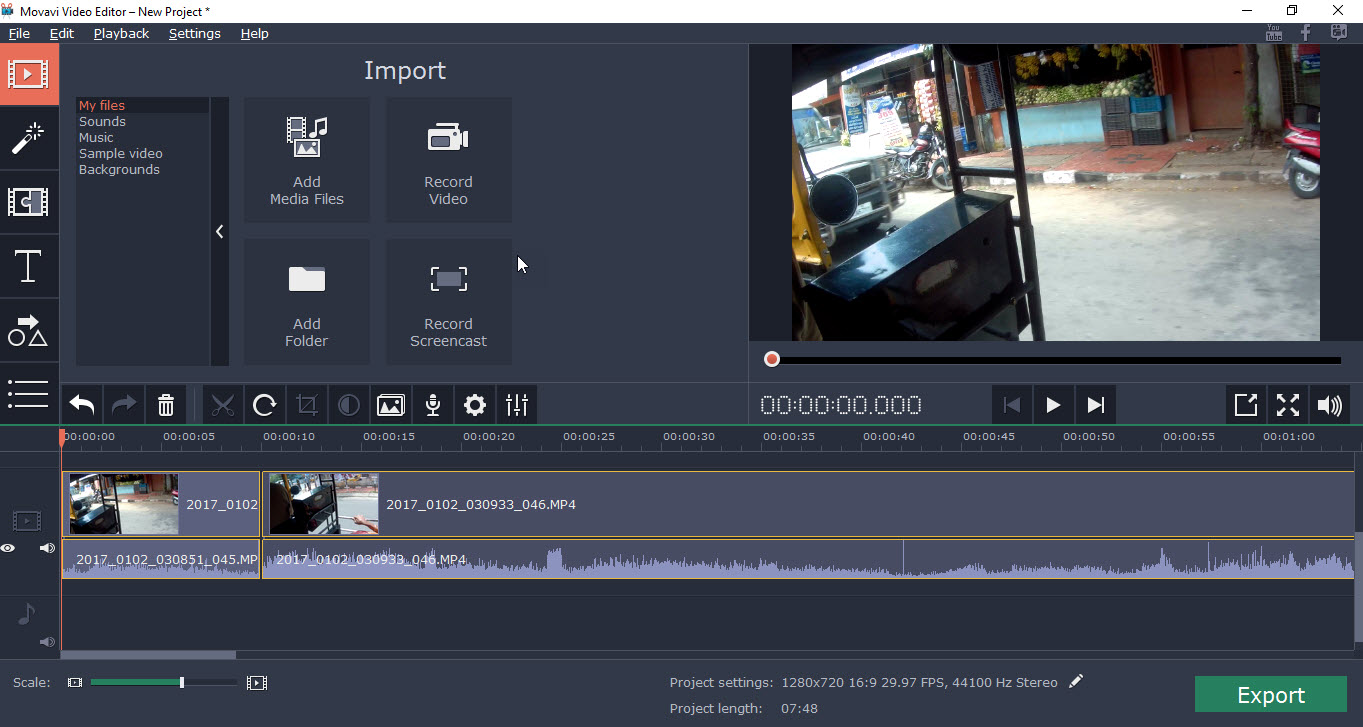
You can add media files you have captured by select “Add Media Files” option. You can add MP4 files separately. However, the Movavi Video Editor also includes an option to which you can add all the files inside a folder by selecting “Add Folder” option. You can also drag the files to the timeline displayed on the bottom portion.
The software also provides an option to record video by selecting Record Video option. It will open a new dialog and the camera details are displayed on the right side. You can record screencast video but these two options are only available if you have installed the Movavi Video Suite. That said, the Movavi Video Editor can also be used to edit videos and create slideshow videos from images.
As soon as you add videos to the editor, you will be able to view a preview of the content on the right-hand side along with the timeline.
If you select the play button, the video will run and the corresponding timeline will move from left to right direction. You can easily spruce up your video by adding sounds and music. You can also add a background of your choice from the provided list to the video.
The left-hand side navigation panel displays additional settings using which you can add filters, transitions, titles, and callouts. With the help of these properties, you can create informative and interactive videos and presentations.
Moreover, users will not be bored just by watching the whole video without any informative content. During the preview of the video, you can switch over to the full view.
Adding titles and transitions
To add a title, stop the video where you want the content to appear. Selecting the big “T” icon on the left side and scroll down and find the relevant title. You can preview each title before adding them to the Movavi Video Editor.
You can add the title by right clicking on it and select “Add to Current Position” option. You can remove the default content and add your own by directly double clicking inside it and add the relevant content. It is also possible to modify the font name, size, and other parameters.
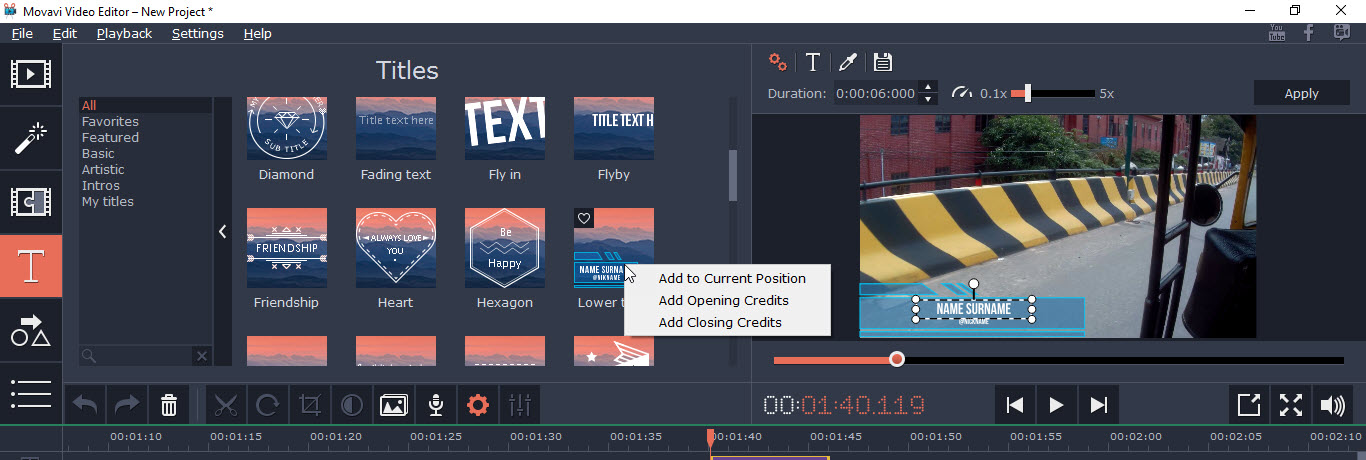
When the video is played, the relevant content slide will pop up in between. You can give your blog URL, Twitter, Facebook and e-mail as titles at various places inside the video. It is also possible to modify the time for the display of the titles.
The editor ships with plenty of titles. You have to test each one of them to understand the functionality. In the same way, you can add transitions. Select the Transitions icon and you will view several options. You need to select a transition, right click on it and select “Add after Current Clip” option. You can also add the transition to all slides but it is advisable to add a different transition to create an impression among viewers.

The callouts option will be useful if you have created a tutorial video and would like to point out a specific point to the user. You can also pan, zoom, highlight, conceal and stabilize the video by selecting an icon with three lines with dots on the left side navigation pane.
Creating Slideshow
To create a slideshow video from a set of images, you need to either select the “Slideshow wizard” option from the splash dialog or select File | New Slideshow option. You will view a dialog as shown below

Like in the case of the video, you can either select individual files or a folder. After adding the images, you can select the transition and add music to the show.

You can also preview the music track by selecting the Play option. If you are not satisfied with the default music, you can add external music files from your computer.

After completing the above steps, you will be returned to the original video editor window where you can enhance the slideshow using filters, transitions, titles, and callouts. The music track will also appear inside the video editor.
Generating video file
Once you are satisfied with the editing work, you need to export the slideshow to a suitable format. You will view a dialog box if you select Export button.
The editor also enables you to directly upload the video to YouTube. You will find the relevant option as upon clicking Upload online tab where you can provide title, description, and tags.

As you can see, the Movavi Video Editor eliminates the need to manually visit YouTube and upload the file. The editor will do the required job for you and it will improve productivity to a large extent.
Conclusion
Movavi Video Editor is a simple tool using which you can edit the captured videos quickly. The user interface is simple to understand and without any complications. We learned the functionalities without any difficulty. Moreover, the processing of the video is faster than the competitors. With plenty of titles, transitions, and callouts at your disposal, you will be able to create educational videos without outsourcing the work to online marketplaces such as Fiverr. If you have captured vacation videos, you can add place related information and other details. In case of the tech unboxing, you can add features and specifications including social media handles with the titles and callouts. The possibilities are endless. It’s up to you to decide how to make optimum use of the editor.
Movavi Video Editor
Pros
- Easy to use
- Simple navigation
- Fast processing
- Plenty of options
- Excellent support
- User manual
- Price
Cons
- Trial period only for 7 days
more recommended stories
 Photomarks Review: Brilliant Watermarking Tool
Security is a vital factor to.
 MagFone iPhone Unlocker Review: Unlock iPad without Passcode
Apple iPhone, iPad, and iPod touch.
 MyRecover Review: Smart Data Recovery Tool
Nowadays, data has become an inevitable.
 Tuneskit Audio Capture Review: Brilliant & Simple Audio Recorder
Imagine a scenario where you need.
 HD Video Converter Factory Pro Review: Amazing Video Management Tool
Nowadays, videos have taken over the.
 ZEDGE Review: Is it a better app for wallpapers?
Do you want additional wallpapers and.
 YouCam Perfect Review: Is it just another image editing app?
Nowadays, smartphones have become part and.
 X Launcher Review: Is it an impressive launcher app?
Normally, you work with the standard.
 WebbyStocks Review: Will it deliver results?
Are you running a blog? You.
 VidClipper Review: Ambitious Video Management Tool With Flaws
Videos are becoming new normal. Hence,.
Leave a Comment